Days 19 and 20

I’m plugging along slowly but surely.  Anyone else still working on this?  I’m losing steam, but determined to finish.

We did a handprint craft on the 19th and Michael took some pictures of Kate and I.  I did it on a frosted transparency, so you can see the next page and the floor through it.  I added a bit of washi tape, a dymo label and a few jewels.

The back has a scrap of cardstock with some journaling, some more washi tape (love that stuff) and a bit of ribbon.

The 20th is actually a bit of a cheater picture.  I didn’t take anything good, so I took a picture of our Christmas Card wreath yesterday.  I just made it a half page and added some rubbons and a dymo label.

First I tried to write directly on the photo, but I didn’t like how it turned out so I put the dymo label over it.  I drew in the heart with a white pen.  I’m really pleased with how it turned out.

I left the back of the page plain.  I love how the other pages look peeking through.  🙂  We’re in the home stretch, just 5 days to go!  I have some other fun stuff scheduled to post soon too.


January Resolutions

I’ll admit it, New Year’s Resolutions intimidate me.  Committing to something for the whole year?!?  Yikes.  Instead of New Year’s Resolutions, I’m thinking January Resolutions.  I do better with short term goals.  🙂  I’ve decided to set 12 goals for myself to accomplish within the month of January.  (Michael thought that 12 was kind of arbitrary, but it’s 12 for 2012.  He’s says I’m in trouble if I make it to 2060.)  I’ll do an update post at the end of the month to see how I did.  Maybe I’ll even go crazy and set some February goals.  I’m not promising anything though.  🙂

1.  Lose 4 pounds.

That’s a pound a week.  Surely I can manage that.  🙂  Really I’m hoping for 6 pounds, but I like to set easy realistic goals for myself.  I’ve been on the dieting bandwagon since late October and I’ve lost 17 pounds so far.  I have a long way to go, but it’s a start!  If you’re wondering about the okra, it’s my go to snack food now.  Salty, crunchy and only 5 calories.  Much better than chips.

2.  Work out twice a week.

Obviously, I would like to work up to 3 times a week, but I need to start with some baby steps.  🙂  We finally got a TV (you can go ahead and welcome us to the 21st century) so I’m hoping to do some kind of workout video while Kate naps.  We’ll see how long this lasts.

3.  Update the blog 3 times a week.

And hopefully manage to keep my 1 week buffer.  (And maybe clean my laptop.  Yikes.)

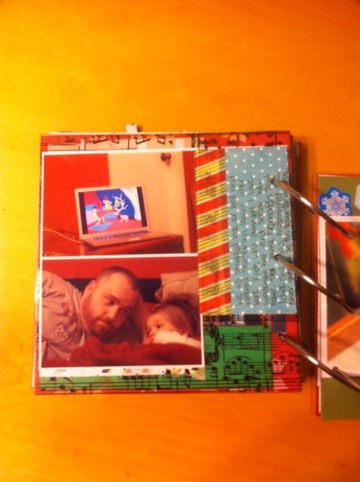
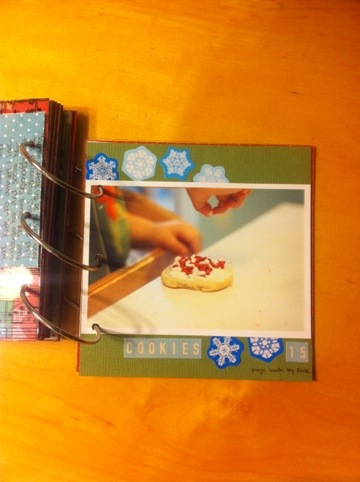
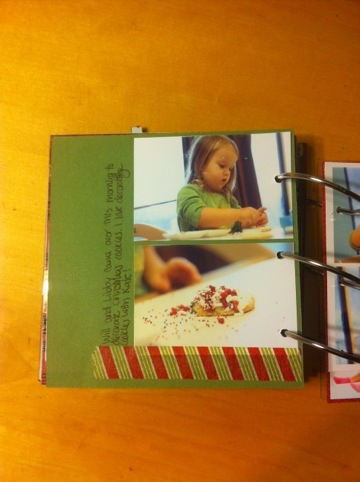
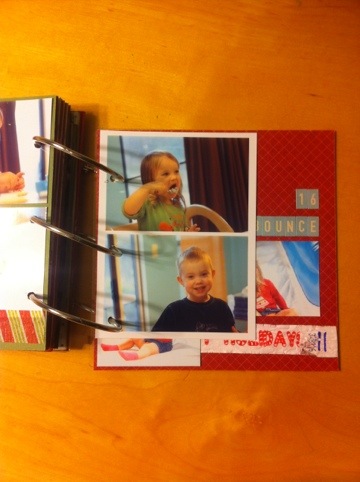
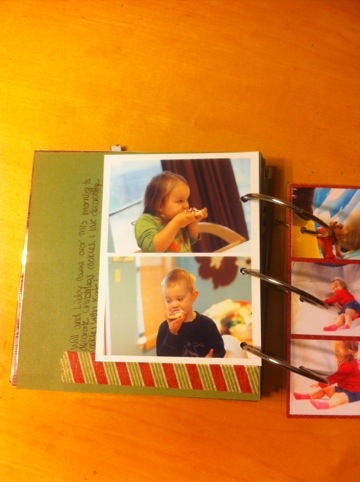
4.  Finish December Daily

I’m so close I can taste it!  I only have 5 days to go.  I would love to get this finished in the next week so I can put it away with our Christmas decorations.

5.  Make 4 new Mama Crafts.

That’s one a week.  Surely I can manage that.  Ideas include new table clothes for our gorgeous new table, a new skirt, and getting started on Valentine’s Day crafts.  I’m hosting a wee little party for our playgroup and I cannot wait!

6.  Cook 2 dinners.

Michael’s a bit concerned about this goal as he does all of the cooing in our house and is a much better cook than me.  I figure I can manage 2 dinners though, right?  I mean, how hard can it be to follow a recipe?  (Way hard, but I’m determined.)

7.  Do 4 new Kate projects.

Kate loves projects and I would love to do some more with her.  I always have good intentions, but then life gets in the way.  I have one prepped (at least I’ve bought the ingredients) and I plan on doing 3 more of the eleventy-billion things I’ve already pinned.

8.  4 Date Nights.

This one might end up being the hardest since I work 4 nights a week.  Still, I think I can make it happen, even if it’s means we’re just watching a movie at home.  🙂  Michael is awesome and always plans things like this, but I think I need to step up and plan some of  my own.

9.  Edit and Order December Pictures

Including pictures for Project Life.  I’ll admit it, Project Life took a backseat to December Daily, but I did catch up on all of my journaling last night.  Now I just need to find some pictures to go with each day.  I also want to get all of the pictures I want to put in Kate’s regular scrapbook ordered.

10.  Walk Ninja Daily

Our poor puppy.  She loves walks more than anything and we have gotten bad about not taking her out.  Family (or at least Mama and Ninja) walks need to happen every night.

11.  Clean out The Pit My Bedroom.

I’ll spare you a picture.  Let’s just say that it needs some serious organization help.  Oh, and no matter how much weight I lose, I’m not going to start wearing old fraternity shirts or skanky club outfits.  I need to cull the clothes in my closet.

12.  Write Thank You Notes.

I’ll be honest, I’m a little embarrassed that I haven’t done this yet.  OK, I’m a lot embarrassed.  I think this might need to be today’s project.

All in all, I think that these are very attainable goals!  I think I’ll start on those Thank You notes now.  🙂

Etching Wine Glasses

I found thison Pinterest (of course) and knew that I had to try it. Etched sayings instead of wine charms? Cute *and* funny. Also, the perfect gift for my stepsister and her new husband. Michael has etched glass before so he walked me though it. I bought a 6 pack of cheap wine glasses from Ikea to use as the base and then sat down to ponder what should go on the glasses. I decided to go with Tipsy, Lush, Buzzed, Bent, Toasted and Loaded. I used SCAL software and cut the templates out of vinyl on my Cricut. Have I mentioned that I love my Cricut?

Obviously, you want to cut the words apart. Make sure you don’t lose any of the bits from inside the a, e, o, d, etc. Then you need to clean the glasses really well with glass cleaner. Apparently the oil in your fingers can screw up the etching stuff. Since I’m a hippy, we use Method glass cleaner instead of Windex.

Once your glasses are nice and clean, stick on the stencils. If the word is longer than 3 or 4 letters, I recommend cutting it in half. Also, it’s easier to get the vinyl to lay flat if you cut some slits up to the edge of some of the letters. Hopefully the picture makes this clearer. If you don’t want to mess with the curvature of the glass, you could always make your letters smaller and put them on the base of the glass.

Don’t forget to add in the little bits from the inside of the letters like “o.” When you’ve done that check your glass from the back to see if there are any obvious bubbles or gaps. I smoothed them down with a popsicle stick somewhat effectively. Mainly I used my thumb nail and tried to avoid touching the glass as much as possible.

Here’s the actual etching stuff. I think Michael bought it a few years ago at Hobby Lobby. It has a fairly intimidating list of warnings. We’ll just say that this is *not* a kid friendly craft and leave it at that.

You just gunk it on with a paint brush and let it sit for 5 minutes. Mine sat longer than that because I was doing all 6 glasses at once. There was no noticeable difference between these and my test glasses which sat for exactly 5 minutes. Don’t get it on your hands.

After (around) 5 minutes, you wash it off with water and peel off they vinyl. Et voila! (Is that right? I barely passed spanish and certainly never took french.) I think they turned out really nice! 🙂

Christmas Cheese Tray

I love that I’ve gotten back into the habit of regular blogging.  I’m not sure how long I’ll be able to keep up this pace, but my goal is to have a post every Monday, Wednesday and Friday.  I’m not going to lie, most of them will probably be Pinterest rip-offs like this one. 🙂

I’ve been planning on making this Christmas tree appetizer for weeks now.  Since I didn’t actually take a look at the directions until I started writing this blog post, I used rosemary instead of thyme.

It was super easy to put together, but looks impressive.  Michael decided to show me up with the tray of extras and make a rosemary tree.  Totally awesome.

Now we’re just waiting for Kate to wake up so we can go share these appetizers with Michael’s family.  🙂

Days 17 and 18

This was a big weekend!  We went down to Houston to celebrate Christmas with my Dad’s family and my Mom’s family.  Lots of pictures!


I just chose a few pictures, because I know that I will go back and make full 12×12 pages for Kate’s scrapbook later.  I used a “the first Noel” rubbon to play on the fact that this was the first of many Christmas celebrations we’ll be having this season.


I added a wee bit of journaling directly onto the photograph, but the bulk of it is on the back.


On the 18th, we went to see Santa!  It’s become a bit of a tradition to go and see Santa with my dad and step-mom.  They are members of the yacht club, where Santa doesn’t drive a sleigh, he comes in via boat.  Since my dad was the one captaining the boat, Kate got to come along for the ride.  She thought it was the coolest thing ever.


Here’s another little page that I added.  Let’s all please note the gorgeous dress she’s wearing.  🙂

My goal is to finish up December Daily in the next week or two and then pack it away with my Christmas decorations.  I’m not always great about finishing things, but I’m making this book a priority.  When I pulled out last years, Kate and I both loved looking through it.  Next year we’ll have 2!

December Daily Days 14-16

I’ve fallen behind, it’s true, but I’m not giving up! Here are days 14-16.

20111222-213139.jpg

20111222-213222.jpg

On the 14th we watched The Grinch. Kate never really gets to watch TV unless she’s sick so this was a huge treat for her. I used a transparency as a base and just made sure to have things on the back to cover the adhesive.

20111222-213554.jpg

20111222-213617.jpg

On the 15th we had our friends Will and Libby over to make cookies. The base for the main page is a Kate creation. I love including her sticker pages 🙂

20111222-213859.jpg

20111222-213922.jpg


I had so many cute pictures that I had to add a page.  It’s 2 4×6 collages adhered back to back.

20111222-214142.jpg

On the 16th we met up with some friends at an indoor bounce house. Kate had a ball!  I included the wrist ID thing they gave her across the bottom.

My goal is to have another December Daily update ready for Monday. I guess I need to start editing some pictures!

Handprint Christmas Trees

I’m working on catching up on some December Daily stuff, but I wanted to post this craft before Christmas.  I helped the girls make handprint Christmas trees for Christmas. I know this will shock many of you, but I found this on Pinterest and knew I had to make it.  🙂

I made a few changes, namely turning the handprints upside down to look more like branches and adding some thumbprint ornaments.  Michael made this awesome stop-motion animation of us doing this project.  So fun!

It was pretty easy to do as far as projects go.  I got some canvases at Hobby Lobby to use as a base.  Sometimes it’s nice to paint on canvas, you know what I mean?  Kate loves it.  After it dried, we did some thumbprint ornaments.  Then Michael painted a trunk for us and I added a star.  Sadly I couldn’t find any glitter, but I think they turned out cute anyway.  🙂


Homemade Wrapping Paper

We were out of town this weekend, but I promise to get back on the December Daily bandwagon soon.  There’s no shame in finishing this project in January!

Those of you who know me well know that I tend to obsess about my Christmas wrapping paper.  In fact, I have been known to take longer picking out the paper than the gifts, a fact which frustrates Michael to no end.  This year I thought I would take a different approach though.  We want Kate to feel involved in our gift giving this year and our goal is to make Christmas about giving *not* receiving.  Not sure how successful we’ll be given the fact that she’s 2 1/2, but we wanted to give it a shot.

Which brings us to the craft du jour, wrapping paper.  Michael has a huge roll of white butcher paper which seemed like it would be the perfect canvas for this project.  I rolled out enough paper to make an approximately 10′ x 10′ square and taped it to the floor.  By the way, that measurement is *totally* made up.  I am terrible at gestimating stuff like that.  🙂

Then I let Kate pick out some paint from my scrap stash.  Probably should have used the crayola washable stuff, but I wanted to give her some more choices.  She went with pink.  🙂  When I first plopped her down with the paint (in her apron and diaper) she asked me for a paint brush.  When I told her we weren’t using brushes today, but just to walk through the paint and make footprints on the paper she looked at me like I had 3 heads, but eventually she conceded and gave it a try.

Once she got past her aversion to getting messy, she was all over it.  She enjoyed doing handprints as well.  She wanted to stick her whole face in the paint at one point, but I put my foot down.

We ran out of pink at one point, but we were still having fun so I got out some green paint.  Ah, pink and green.  My favorite color combo.  🙂


I will say that I was very worried before we started that she and Ninja (out toy poodle) would get paint all over the floor but they were both great.  Kate did forget and step off the paper a few times, but I just wiped it right up with a wipe.  Might want to do this outside if you have carpet.

Kate definitely needed a bath afterwards, but we had a blast.  She turned to me while I was cleaning up and said, “Mama, I’m happy.”  ::melt::  Me too, honey, me too.  Now I just need to design some tags and we’ll be all set.

Christmas Card Wreath

I really should have an awesome December Daily post today. I didn’t have to work *and* Kate took a killer nap. I even have cute pictures. What’s my excuse? A friend of mine started a craft blog and I got sucked in last night. There I was at 1:30 (AM) addressing my Christmas cards when I came across UncraftyMommy. There was nothing to be done but to drop everything and make this wreath. I even roped my friend Libby into helping when she came over for a playdate this morning.

20111216-001835.jpg

Mine is not nearly as cute as the original, but it gets the job done. I didn’t bother setting up a tutorial since UncraftyMommy did a great job on hers.

Only changes I made were to paint the clothes pins with acrylic paint and to use fewer clothes pins. Both were changes of necessity. The weather here is gross so spray paint was not an option. Also, I’m super impatient so waiting for a clear day just wasn’t going to happen. As for the number of clothes pins, I bought the last package at Joanne’s. To make up for the circumference, I put 3 pony beads in between each clothes pin instead of 1.

I wasn’t able to make it a perfect circle, but the wonkiness is much improved by the addition of some cards. Hopefully there will be some more December Daily content tomorrow!

December Daily Day 13

Simple pages today. We went to Abby’s preschool sing-a-long program. I cut out a few more trees from the same old scrap of patterned paper.

20111215-003307.jpg

On the back I cut out a piece from the program.

20111215-003523.jpg