Recycling Center

We went on a field trip to the Recycling Center with our Adventure Friday group today!  Have I talked about our Adventure Friday group yet?  It’s so beyond awesome.  One fantastic mom puts together these awesome adventures for us every week.  🙂

This week we got to tour a local recycling center.  They showed us around and talked about all of the different things they could accept for recycling.  Did you know that the numbers on the bottoms of plastics referred to the number of times they had been recycled?  So 1?  First time it’s being recycled.  2?  Second time it’s being recycled.  Cool, huh!

I should mention that it was a wee bit hot outside.  And Kate was a bit over it by this point.  I thought it was super cool though!

It might be fair to say that the moms were more interested in this than the kids.  I will say though that Kate is much more interested in recycling at home since we went on this tour.

Pointillism Fail

This seemed like such a good idea when I saw it on Pinterest.  Trust me, it’s not.  At least not if you have a 3 year old.

We started off strong.  I drew a circle on some paper, gave Kate a Q-tip and told her to go to town with the yellow paint.

She started with some nice, controlled dots.  I may have gotten a bit overconfident at this point.  Never a good sign.

Then Kate got impatient with small controlled dots.  She started ::gasp:: globbing paint.  It’s really not her fault.  After all, she and I do share 50% of out DNA.

Sadly, that didn’t stop me from getting frustrated with her.  ::sigh::  I wish that I had limitless patience.  In reality, we put the paint away for 5 minutes and started again when we were both in a calmer frame of mind.

Side note: apparently I suck at mixing paint.  When using crayola finger paints, yellow and red do not in fact make orange.  They make more red, regardless of how much yellow you add.  Truly, it defies logic.  She really wanted to do some blue. so I had her work on the sky.

And here’s our finished project!  Clearly I couldn’t find the brown paint.  What can I say, art is about the process!  Not the product!  🙂

October Daily

2 of my scrapping buddies talked me into doing October Daily this year. Essentially, we’re doing a December Daily, but in October. Y’all, I was pretty resistant at first, but I *love* Halloween. LOVE it! The base of my album is the new Authentique line, Enchanted. I’m also going to be using scraps from previous years. It will be structured like my December Daily: 6×6 pages with one sheet (front and back) per day. On days that I have more to say, I’ll add in extra pages.

I still need to construct the covers (I’m thinking acrylic?) I’m a little behind since I was finally convinced to join this madness on October 1st. 🙂 I’ll likely have a few posts with my best pages unless there’s more interest in which case I’ll post more. Mom? Mimi? Bueller? (This is me soliciting comments in case you were confused. 😉 )

Without further ado, here’s page 1. It’s totally staged. Kate really does love this game, but she wasn’t in the mood to do it at the time I decided to do October Daily. Luckily she’s a huge ham so she agreed once I told her that I just wanted to take pictures. 🙂

20121002-153546.jpg

I also made invitations for her playgroup Halloween party on the 1st so I included one on the back page.

20121002-153705.jpg

Halloween Counting Activity

I don’t even know who to credit with this idea.  I feel like I’ve seen this on a million Montessori blogs.  The basic idea is that you match up the written number with the number of small physical objects.  Clear as mud?  It’ll be clearer as we go through the tutorial.  🙂


It all started when I saw these decorative thingies in the dollar section at Target.  I had to have them!  (I haven’t mentioned yet that I’m having a Halloween themed play group party yet, have I?  Get excited.  🙂  )  And then I realized that they would be perfect for a Montessori counting activity that I had seen everywhere.  First I set out to create the numeral cards.  Pumpkins!


I found a free SVG file, but it had swirlies off to the sides.  No worries, I layered it up in SCAL and then cut it out in my cricut.  Awesome!

I cut off the swirlies and voila!  Ten pumpkins!  Now onto stamping.


I rarely stamp, but that hasn’t stopped me from procuring a large number of them.  🙂  I stamped the numbers 1-10 on the pumpkins.

Then I put the pumpkin cards along with 55 of the plastic pumpkins in this super cute pail that I also found in the dollar section.  Now onto the actual activity. 🙂


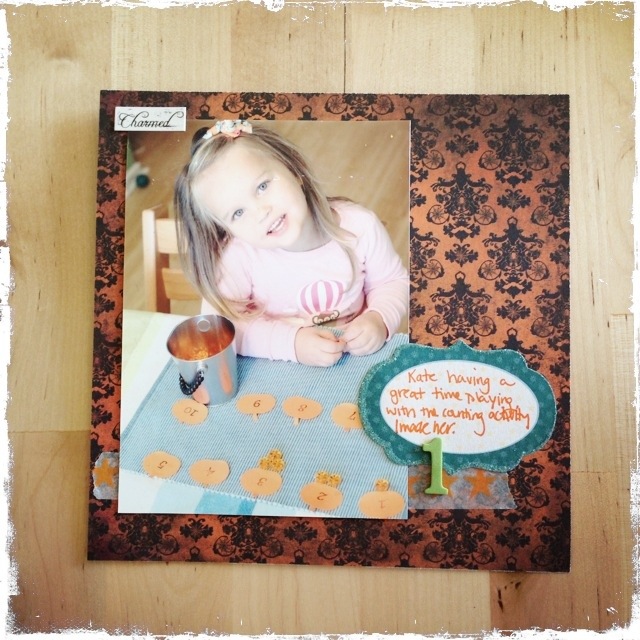
First I had Kate lay out the pumpkin cards.


Then she counted out the plastic pumpkins to correspond with the number cards.  So she set one plastic pumpkin under the pumpkin card with the number 1.  The pumpkin card with the number 2 on it had two plastic pumpkins set under it.    Continuing all the way to 10 plastic pumpkins.  Having exactly 55 plastic pumpkins in the pail helps her to check her work.  If she runs out of pumpkins or has pumpkins left over, she knows to go back and recount.

I made another similar set so that Kate and Emily could both play at the same time.  For these I started by cutting 10 2 inch squares.


Then I stamped a bat and the numbers on the cards.  I counted out 55 of the little plastic ghosts and put them into another pail with the bat cards.

I helped Emily lay out the cards in order.  She was concentrating very hard!

10 was a little more than Emily wanted to deal with so I ended up giving her 5 cards instead.

Kate and Emily loved this!  Kate’s had some experience with activities like this at school and she loved showing Emily how to do it.  They’ve played with these several more times already.  This was totally worth the effort.  🙂

Canvases

I decided to move some stuff around in the living room and put all of my canvases on the same wall.  The plan is that eventually, there will be 9 canvases.  🙂

Googly Eye Picture Frame

I actually made this project last year, but I didn’t get the picture printed until after Halloween so I’m posting it now.  🙂  It is, of course, from Pinterest.

Basically, I took a cheap Ikea picture frame and painted it bright green.  Then I glued down a ton of googly eyes with mod podge.

Incidentally, it takes way longer and uses way more googly eyes than you expect it to.  🙂

Still, I think it turned out cute and it’s not difficult, just time consuming.  🙂 I debated adding some ribbon and letters like in the example, but it didn’t look right with this thinner frame so I left it off.

Spin Art

Michael had the day off from work today so we headed up to Hobby Lobby to look around for a fun project to work on.  We ended up buying a spin art machine.  How fun is that?!?  I totally remember playing with one of these as a kid.

This one came with some paper and tiny containers of paint, sand and glitter.

We had a blast playing with this.  I love crafty activities that the whole family gets into.  🙂

It made a huge mess, but it was worth it.

The sand kind of went everywhere so Kate ended up wearing Michael’s safety goggles.  So cute!


More Vinegar and Baking Soda

Kate loves playing with vinegar and baking soda.  Generally I fill up a baking pan with baking soda and than fill up a muffin tin with different colors of vinegar.  Today I decided to mix it up a little.

First I spread a layer of baking soda in the pan and then I added a bunch of drops of food coloring to it.

I then put another thin layer of baking soda over the top and told Kate that we were going to hunt for treasures!

I gave her a medicine dropper and a cup full of plain vinegar and told her to go to town.

She thought it was really neat to see the different colors show up when the vinegar hit a pocket of food coloring.

She had a fun time, but then asked for “regular” baking soda and vinegar.  I think she prefers to pick her own colors instead of them being a surprise.  Little bit of a control freak, this one.  🙂


Pumpkin Stamping

Kate and Emily were at preschool while I made my pumpkin, but they spied the other pumpkins and demanded to make their own crafts.  🙂


So after nap I pulled out some green paint and some foam Halloween stamps.  Kate was horrified that I wouldn’t get her pink paint, but she came around eventually.


I spread the paint out in a thin layer so that it would be easier to stamp and let the girls go to town.


The upside of this method was that it was remarkable unmessy for a painting activity.


The downside is that the stamps totally don’t show up because the pumpkin is curved.


The girls loved the novelty of stamping on the pumpkins, but this would obviously work better on paper if you want the actually stamps to show.  We might try that next week.

Still, the girls were thrilled and that’s what matters to me.  🙂

Ribbon Pumpkin Tutorial

Halloween is seriously my favorite holiday.  So we’re going to get started with the halloween crafts a little early, m’kay?  Just be glad that I waited until September was halfway over to start.  (I’ve been pinning stuff since mid August.)

First up is a ribbon pumpkin from Pinterest.  The original had you hot gluing ribbon on the pumpkins, but I decided to go with mod podge instead.

I found these cute tiny little pumpkins at HEB and I couldn’t resist.  I knew they would be perfect for this project.  I had a tiny bit of bat trim left over from 2 years ago (I think it was Making Memories?) and I bought some black ricrack and Martha Stewart washi tape from Joannes.  Honestly, I was hoping to find more black trims at Joannes, but I had to settle for the washi tape instead.

I painted a strip of mod podge on the pumpkin and then set the first piece of trim in one of the grooves.

Then I painted more mod podge over the top.  Side note: I love mod podge.  It is seriously stinky, but it’s awesome.

After the bats, I added the ricrack.

Then I added the washi tape and painted a coat of mod podge over the entire pumpkin.  The trim worked a lot better than the washi tape, but I’m still pleased with the look of the pumpkin overall.

And yes, I use the Valentine’s Day table cloth as a crafting table cloth.