…with digital project life! I watched some lovely youtube tutorials and I now feel ready to conquer the world! Or at least Photoshop. 🙂 I couldn’t wait any longer for my Honey edition before I started playing. I’m way too cheap to pay for more than one, so I went off in search of free digital cards that I could use. Y’all, I found the jack pot! You have to check out this girl’s stuff, it’s amazing and a ton of it is free! Best of all, I think it’s going to work really well with the Honey edition when and if I buy it. I had hoped to have a whole spread done by last Tuesday today but there’s been a bit of a learning curve. (I don’t even mind that it’s taking forever though because I love it!) I do have the left half of the layout finished minus the title card which I’ll put in after the Honey edition is released. ::please be released on Monday::
 Shall we go through the layout? (Can you tell that I had extra caffeine today?) Just imagine that I have a title card in the top corner, mkay? I want to use at least one thing from the Honey edition for consistency.
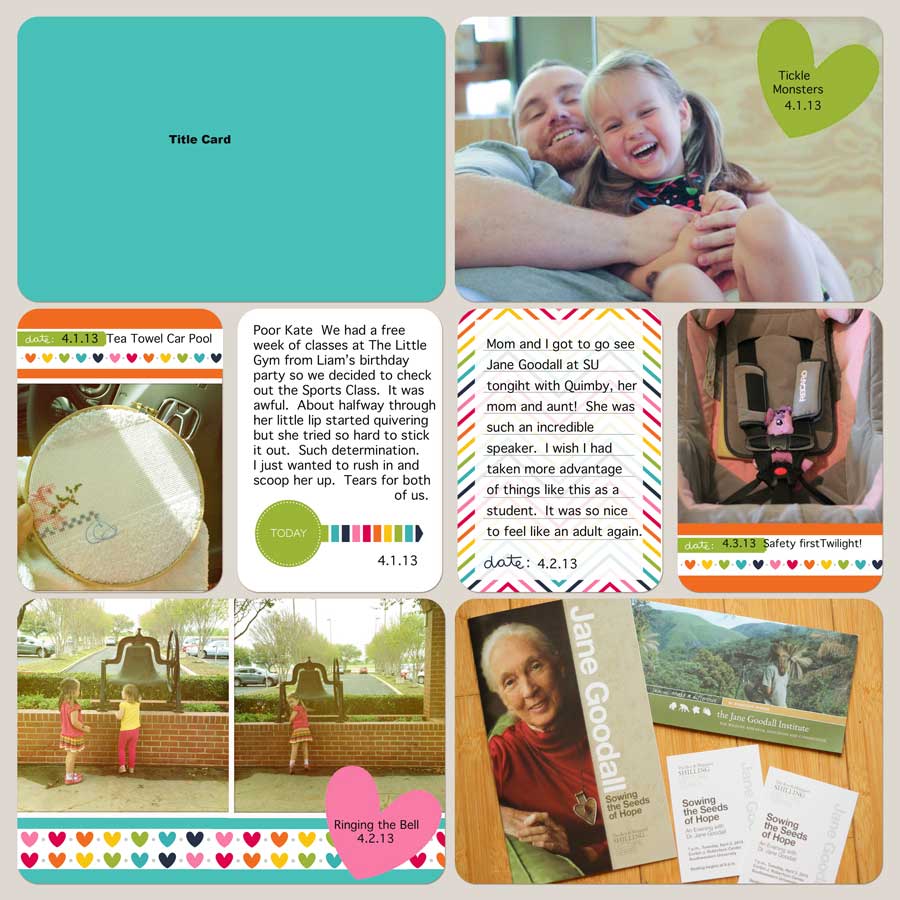
Top right is a DSLR photo. I don’t know the real terms for any of this stuff, but I basically cut and pasted the heart from one of the journaling cards, made it bigger, rotated it a bit, and added some text.
Middle left is a Hipstamatic photo. They’re square like Instagram photos so when I shrunk it down it left this weird gap. I cut the bottom off of one of the journaling cards and shrunk it down to go on top. I loved it so much that I saved it as a separate file. Never mind that I cut it and resized it 3 different times before that occurred to me.
Middle 2 cards are regular journaling cards. I took the lines out of the left one and I’m toying with the idea of making it a color. We’ll see. Right one I used as is.
Far right is exactly the same as the far left except it’s a DSLR photo.
Bottom left is 2 hipstamatic photos that I shrunk down. I cut a strip from one of the filler cards and repeated it 2 1/2 times to get the strip of hearts. (It’s like custom never ending washi tape!!!) Then I added a pink heart just like I did in the top right.
Bottom left is just a plain DSLR photo. I’m trying to talk myself out of adding more crap to it. 🙂 It is an example of how I plan to tackle ephemera now that I can’t just slip it in a pocket. I took a picture and then in 10 years, once I’ve fully committed to going digital, I’ll throw it away. Until then, I’ll stick it in a box in case I change my mind and switch back to traditional. 🙂
The verdict so far? Well, it’s slow. In 3 days, I’ve made 3/4 of a layout. Also, I can’t just stick ephemera in. But y’all the good *far* outweighs the bad. I think that I’ll get much faster. Also, I love that I can look at a whole layout at once, pictures and journaling, without having to print pictures every week (which just isn’t going to happen.) I love that I can easily resize the photos instead of being stuck with whatever I print. I love that when I forgot a picture, I could get it immediately instead of waiting for another print order to arrive. Most of all? I love that I could make “washi tape” and “stickers”! And that I will never run out of my favorite supplies!
I’ve had some questions about what I plan to do at the end of the year and the answer is I’m not sure. Eventually I want to get it printed as a blurb book, but I’m not too worried about if that happens at the end of this year or 10 years from now. I’m definitely not printing individual pages. 2 of my biggest reasons for going digital were to save space (I have way too many albums) and to save money for other scrappy purchases. Printing 12×12 pages really cuts down on those benefits.
Oh, and I’m almost done with our B is for Bumbleebee stuff! I’m hoping to finish it up this weekend and have it post on Monday. 🙂
